
ORCID (Open Researcher and Contributor ID) (‘or-kid) is an open, non-profit, community-based effort to provide a registry of persistent unique digital identifiers which are linked to researchers' scholarly and grant activities.
![]() It is often a requirement by publishers and funders.
It is often a requirement by publishers and funders.
![]() Interoperable with different platforms:
Interoperable with different platforms:
![]() Auto-updates your listed works if you set up wizards / trusted organisations to quickly update / auto-update your works.
Auto-updates your listed works if you set up wizards / trusted organisations to quickly update / auto-update your works.
![]() Input once, reuse often: If your education, employment, grant information and publication categories are populated and updated from time to time, you will be able to generate a complete and up-to-date CV using the Print View function
Input once, reuse often: If your education, employment, grant information and publication categories are populated and updated from time to time, you will be able to generate a complete and up-to-date CV using the Print View function
Step 1: Go to ORCID registration form.
Step 2: Fill in the required fields.
Step 3: Select visibility settings.
Step 4: Agree to the terms of use.
Step 5: Click on the link in the confirmation email to activate your ORCID.
Step 1: Sign in to ORCID.
Step 2: Click on Add Employment and type Nanyang Technological University.
Step 3: Select National Institute of Education, Nanyang Technological University from the drop-down menu.
Note: Before doing authorization. set your profile visibility to 'Everyone' in Account settings. For your name and email, click the pencil icon to set their visibility to 'Everyone' as well if they are not already public.
Step 2: Click authorization link.
Step 3: After reading About ORCID, click Proceed.
Step 4: After reading NTU requirements for ORCID, click Proceed to Authorize.
Step 5: Click Authorize.
After successful registration and login, you will be redirected back to the NTU system where an acknowledgement page will be displayed. Read the acknowledgement message and the process is now completed.
Note: Importing data from multiple author profiles may lead to duplicate entries.
![]() If you have a Google Scholar profile:
If you have a Google Scholar profile:
Step 1: Sign in to your Google Scholar profile*.
* Tip: Use Google Chrome or Microsoft Edge if you plan to export all publications and Mozilla Firefox if you plan to export only some publications to your ORCID profile.
Step 2: Check the boxes to select the publications that you want to export to your ORCID profile.
Step 3: Click Export and select BibTeX.to export the bibliographic data.
Step 4: The BibTeX formatting will open in a new window.
Step 5: Right click to open the options menu and select Save as/Save Page as. Save the plain text under the file name 'citations.txt'.
Step 6: Sign in to ORCID.
Step 7: Under Works section, click +Add and select Add BibTeX.
Step 8: Click Choose BibTeX file to import to open the file menu, then select 'citations.txt' and click Open.
Step 9: Select your works and click Import works to your record and the publications will be added to your ORCID profile.
Detailed Instructions on how to add works from Google Scholar
Note: Importing data from multiple author profiles may lead to duplicate entries.
![]() If you have a Web of Science account:
If you have a Web of Science account:
Step 1: Sign in to Web of Science.
Step 2: Click Menu icon on the left-hand-side of the page. Under Profile, go to My records, then select Publications +ADD.
Step 3: Select Sync with ORCID and click on the link.
Step 4: Navigate to ORCID Syncing and click CONNECT YOUR ORCID ID.
Step 5: Once your ORCID account is linked, select Authorize access to grant Web of Science researcher profile permission to update your ORCID works.
Step 6: Click Export publications To ORCID now.
In your ORCID account, your Web of Science Researcher Profile will now appear under Other IDs. Your authored publications from Web of Science are now added under Works in ORCID.
Detailed Instructions on how to add works from Web of Science
Note: Importing data from multiple author profiles may lead to duplicate entries. If you have more than one Scopus Author ID, your publications may be spread over a number of different Author IDs, as these are automatically generated based on author name variants or differences in affiliation. Please ensure that you have merged your Scopus Author IDs before linking with ORCID.
![]() If you have a Scopus Author Profile (Author ID):
If you have a Scopus Author Profile (Author ID):
Step 1: Sign in to ORCID.
Step 2: Go to Scopus2ORCID Feedback Wizard and click Start.
Step 3: Select the Scopus Author Profile that belongs to you. Click Show recent documents to ensure that the profile belongs to you. Click Next at the bottom right-hand corner of the screen.
Step 4: Select the preferred profile name for your unique author profile and click Next.
Step 5: Review your authored publications. Click on the X button(s) for any publications that should be removed from your profile. If publications are missing, select Search for missing documents link. Once finished, click Next.
Step 6: Ensure that the information displayed is correct. To confirm, click Next.
Step 7: Enter your institutional email address. Click Send Author ID.
Step 8: Click Send my publication list.
Step 9: Click return to ORCID.
In your ORCID account, your Scopus Author ID will now appear under Other IDs. Your authored publications from Scopus are now added under Works in ORCID.
![]() If you have publications or datasets with a DOI (Direct Object Identifier):
If you have publications or datasets with a DOI (Direct Object Identifier):
Step 1: Login to ORCID.
Step 2: Click on Add Works and select:
Step 3: You will be asked to allow access to your ORCID record. Click Authorise.
Step 4: Do an author search or title search for your publication.
Step 5: Click Add to ORCID.
![]() If you have publications without a DOI (Direct Object Identifier):
If you have publications without a DOI (Direct Object Identifier):
Step 1: Login to ORCID.
Step 2: Click on Add Works and select Add Manually.
Step 3: A screen will pop-up. Manually type in information of your publication.
Step 4: Click Add to List once completed.
Guided video: How to import works into your ORCID record using a Search & Link wizard
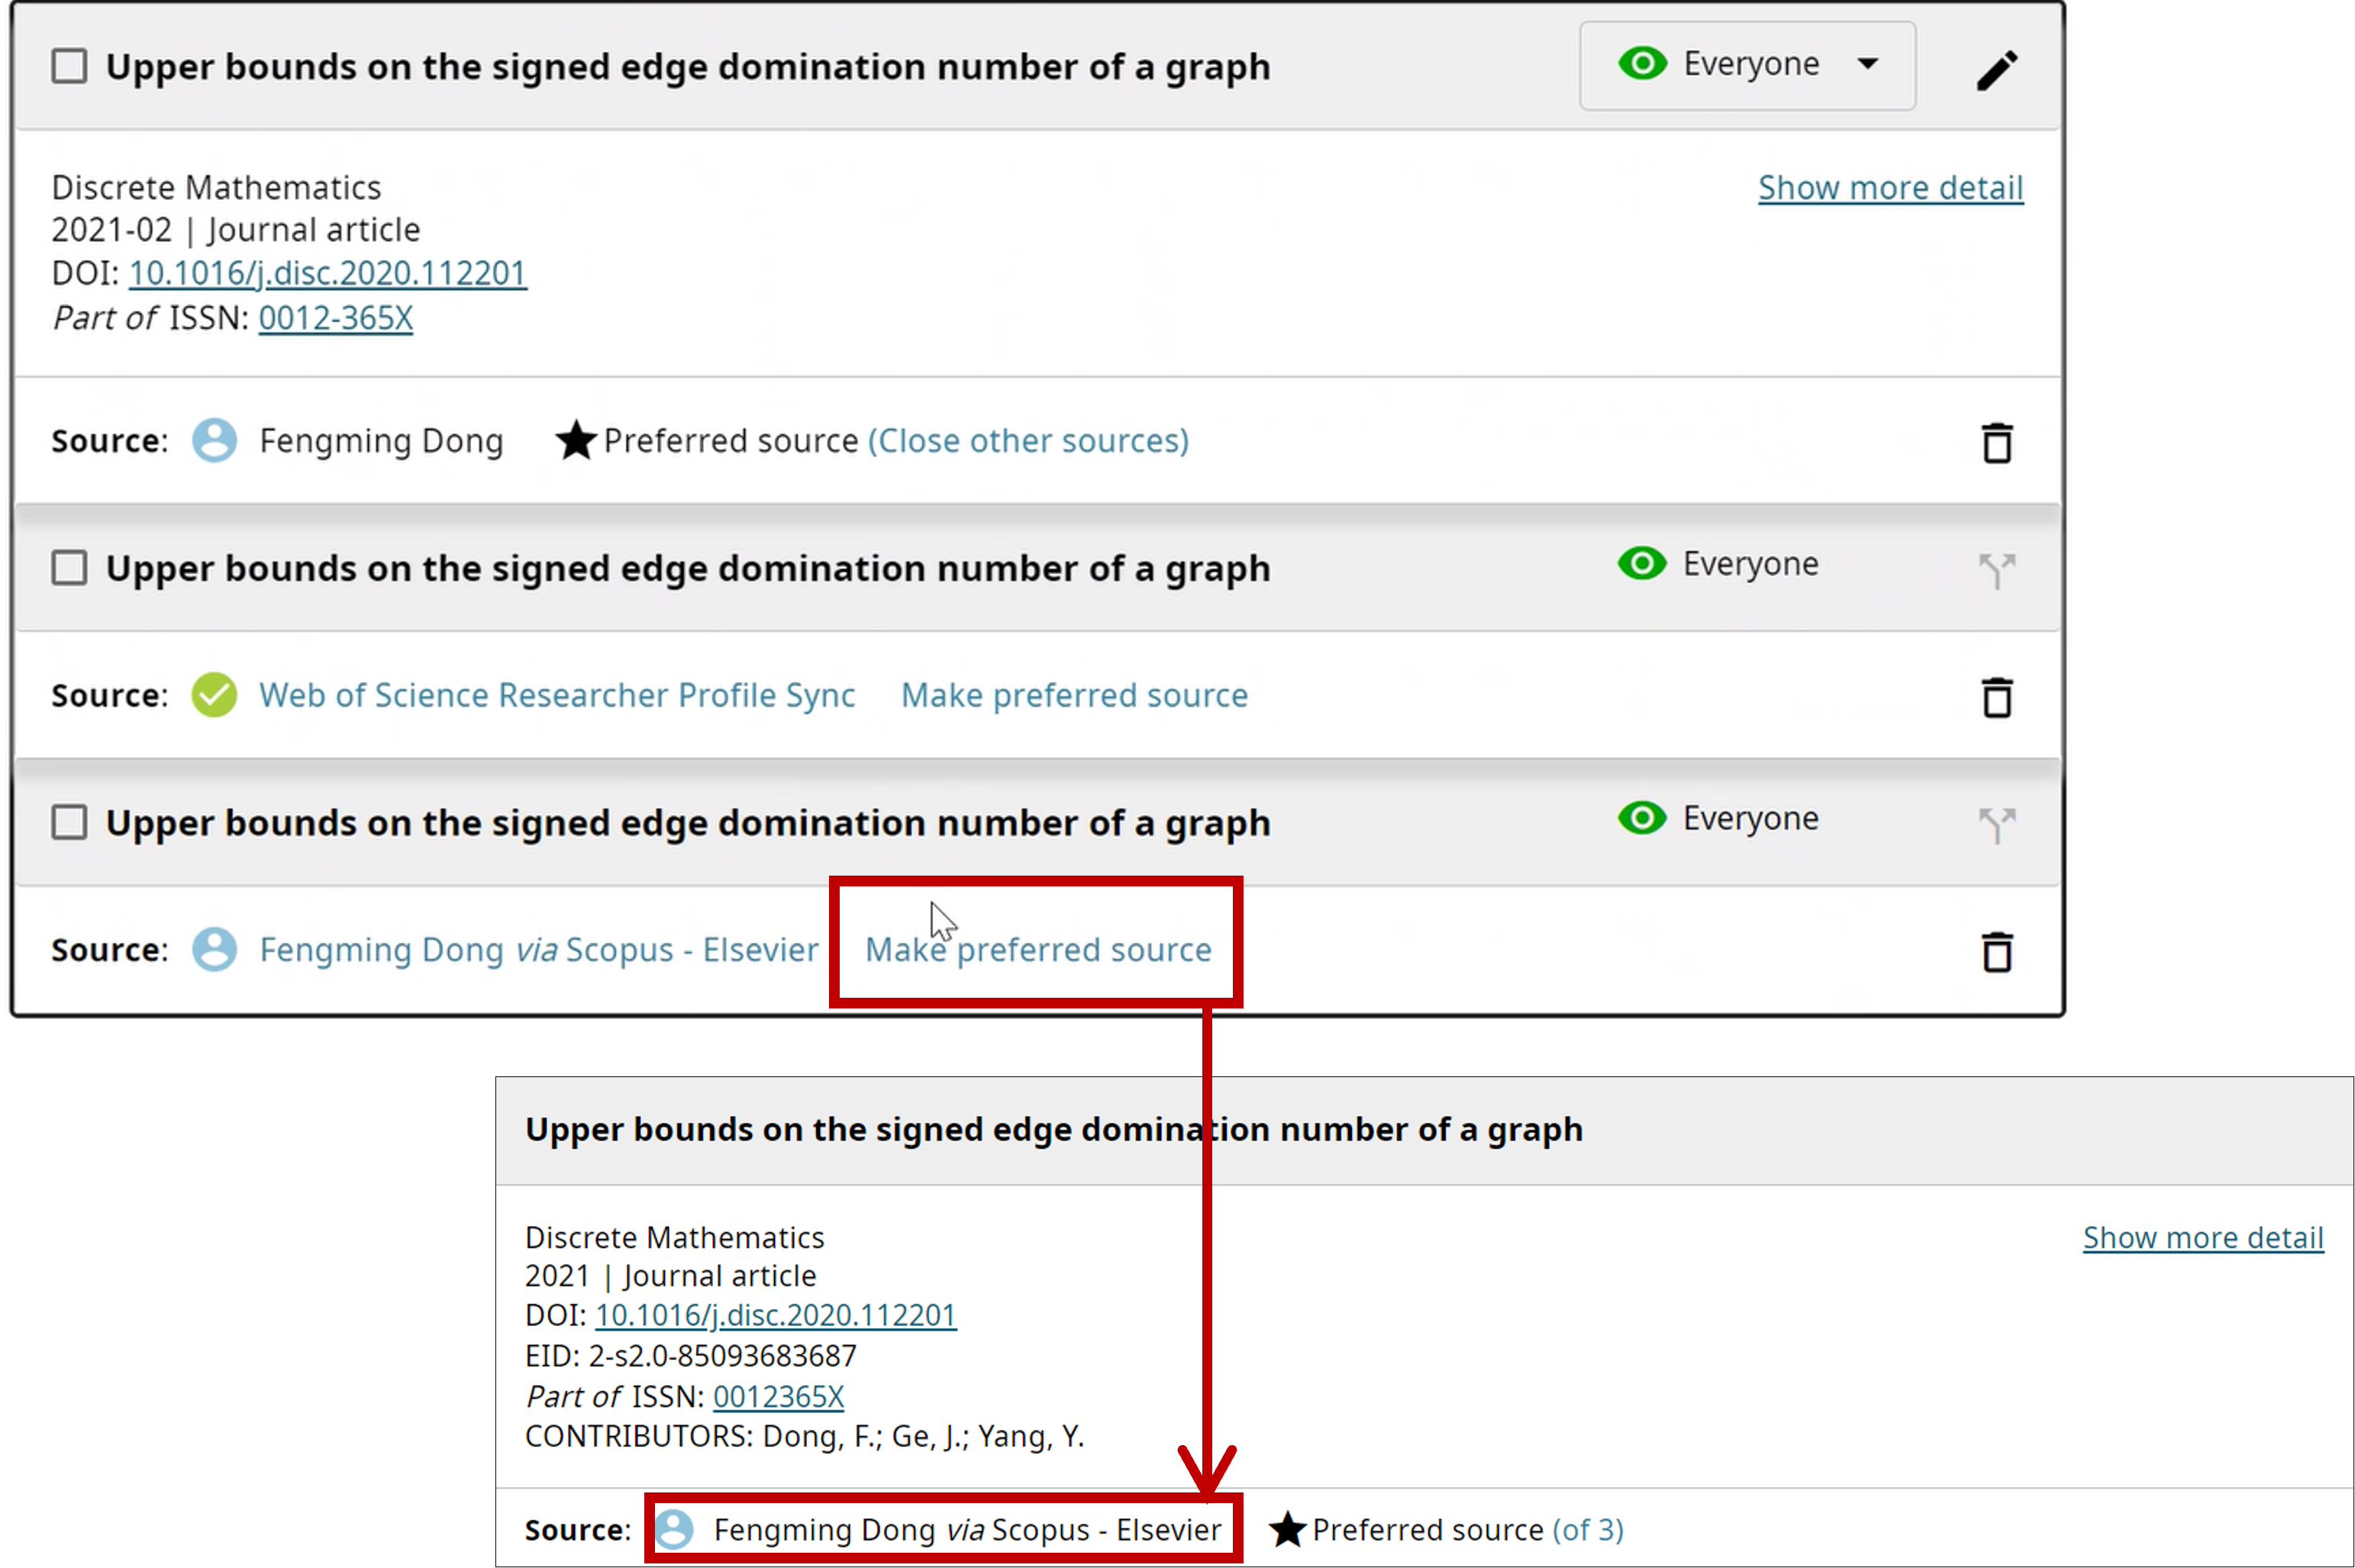
Ideally, you’ll want your source to display one of the more authoritative or credible sources. If your article has multiple sources to choose from, you can easily change your preferred source.
Step 1: Click on the link beside “preferred source” to see all the available sources.
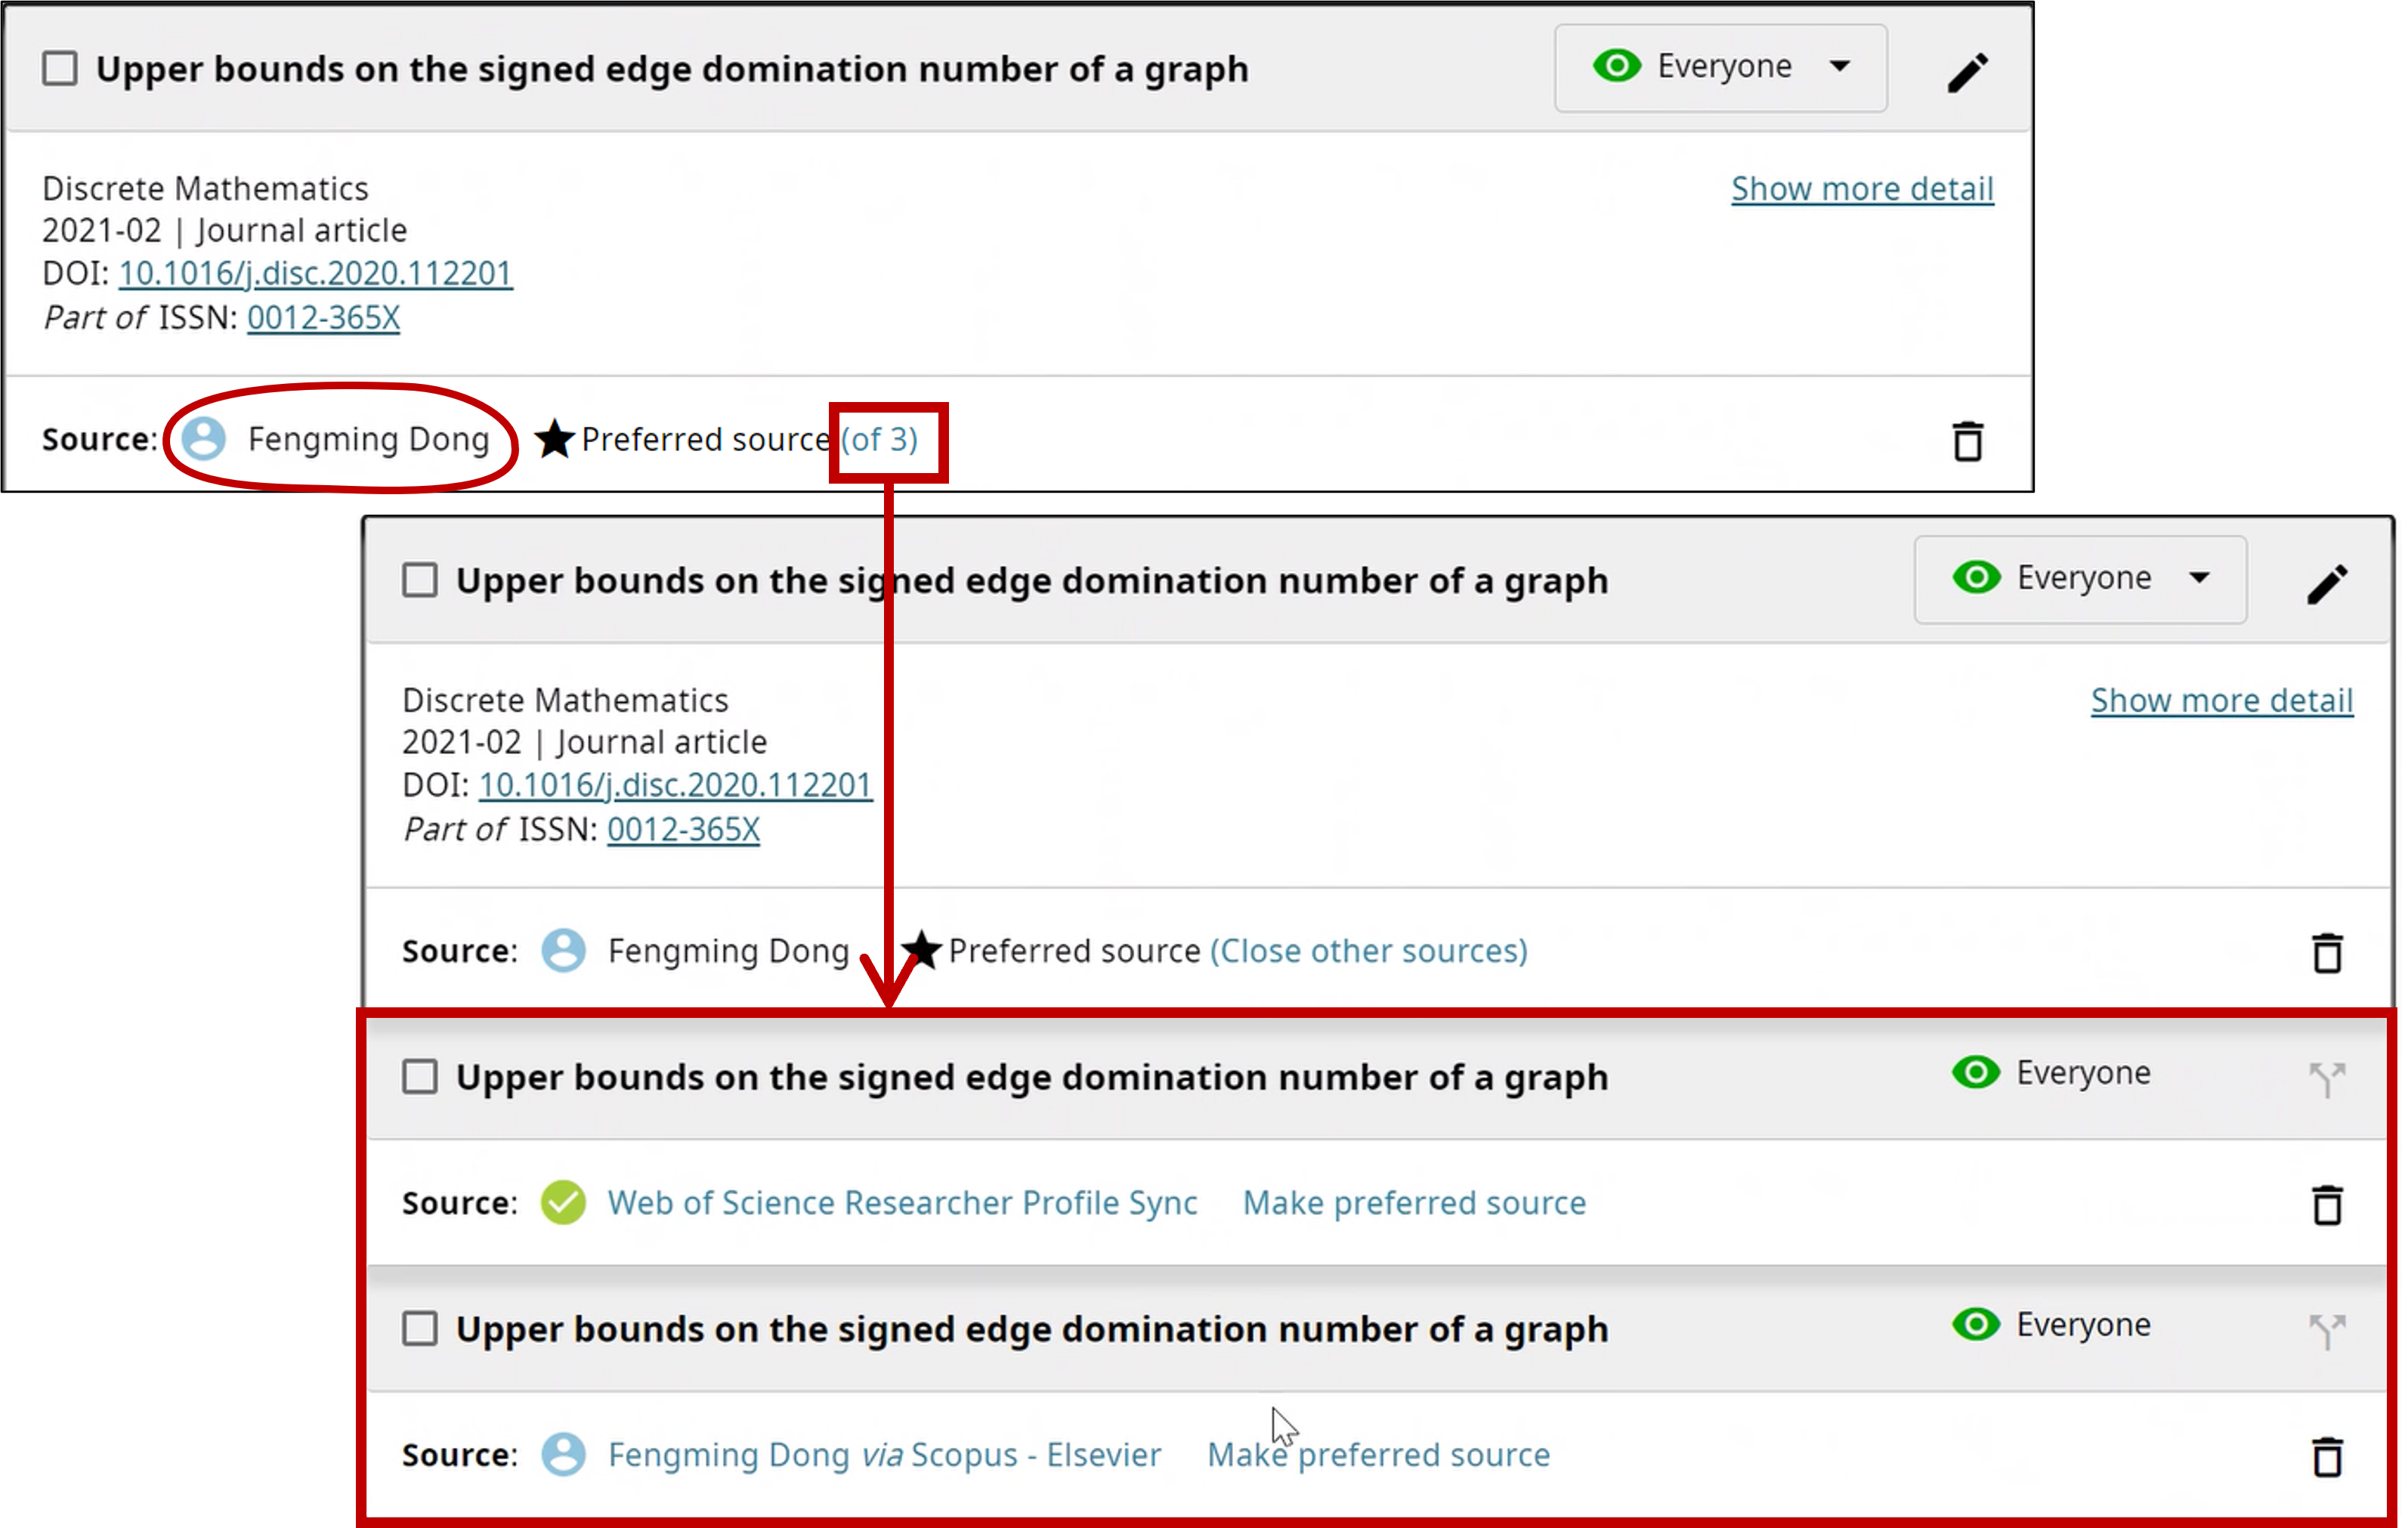
Step 2: Select the credible one and set it as the "preferred source."
![]() Link to other websites such as NTU Academic Profile, in addition to Google Scholar, ResearcherID/Web of Science and Scopus ID.
Link to other websites such as NTU Academic Profile, in addition to Google Scholar, ResearcherID/Web of Science and Scopus ID.
![]() Set up auto-update of new publications via CrossRef and DataCite.
Set up auto-update of new publications via CrossRef and DataCite.
![]() Keep a comprehensive list of publications in your ORCID account because:
Keep a comprehensive list of publications in your ORCID account because:
ORCID: support@orcid.org